Midknits

Modern Knit and Crochet Patterns

knit

Very A-moose-ing Knit Pillow

YarnspirationsErin Black

I was very a-moose-ed with this free knitting pattern from the Yarnspirations Canada 150 Lookbook, so I knit one up to celebrate the majestic moose in all of its Canadian glory!  

This 20" x 20" (58.8 cm x 58.8 cm) cushion uses Bernat Maker Home Dec Yarn which happens to be one of my faves. I love it because it creates amazingly smooth stitches with awesome definition and it is thick and durable, so it knits up quickly!

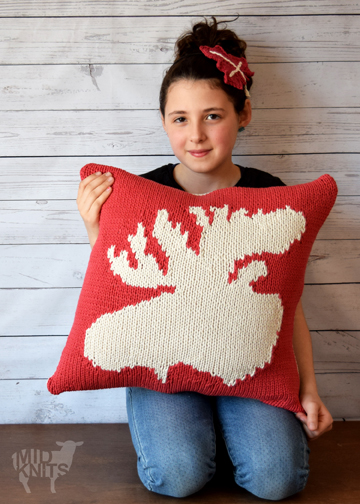
One side of the pillow is cream with red and the reverse is red with cream (this way you only need one ball of each colour to finish the project!)

DSC_0264_copy2lr.jpg

Once I finished knitting both sides I buckled down for a good ole blocking. I know that not everyone does this, and I don't always do it for every project I work on, but I find when you are working with Intarsia knitting a good soak makes the stitches sit much more evenly.

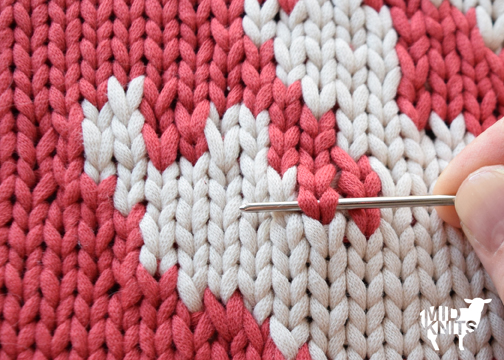
I even use a tapestry needle to grab each individual stitch and adjust the gauge until it looks exactly like I want it to.

Check out those crisp edges, corners, and stitches! Now it's time for assembly (for a cushion it is pretty easy, just stitch three sides together, stuff it, and then seam up the fourth side.)

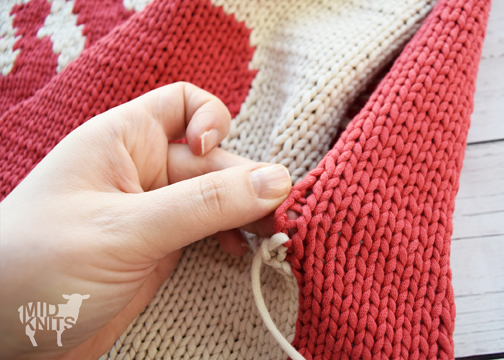
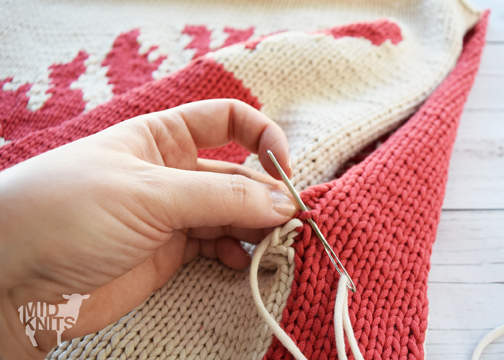
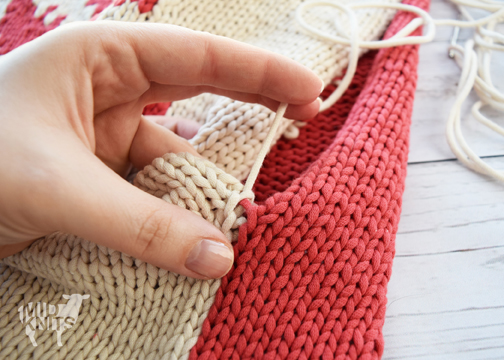
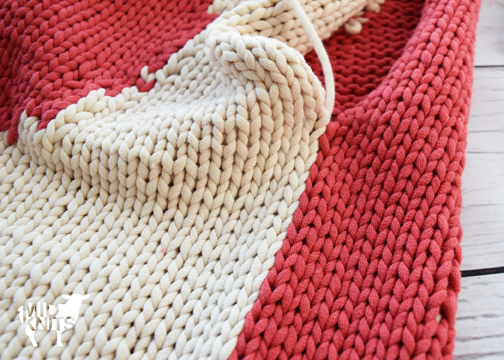
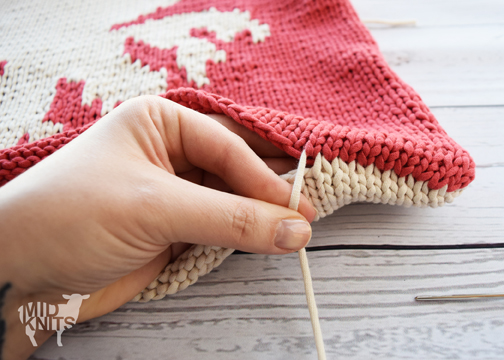
To seam the vertical sides of the cushion I used an invisible vertical seam.

How-To: Using a tapestry needle and a piece of Bernat Maker Home Dec in a corresponding colour to the cushion work with the sides of the cushion lined up stitch-by-stitch:

+ Insert the needle under the horizontal bar between the first and second stitches.
+ Insert the needle under the corresponding horizontal bar between the first and second stitches on the other piece.
+ Continue in this manner, working from side to side, and pulling the yarn taught.
+ Check out your awesome invisible seam!

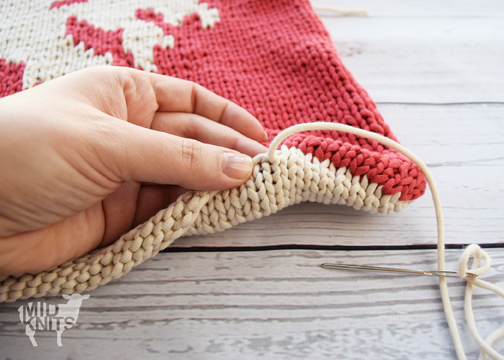
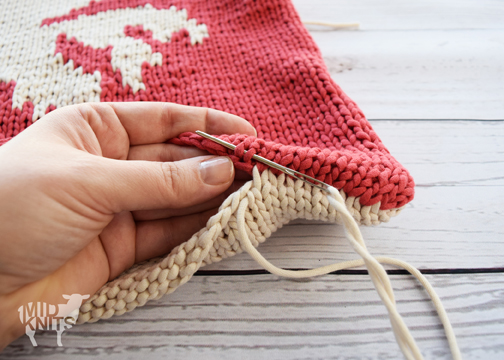
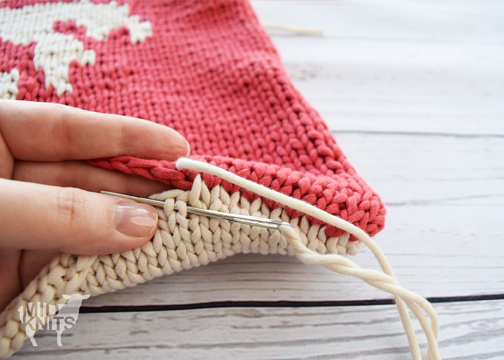
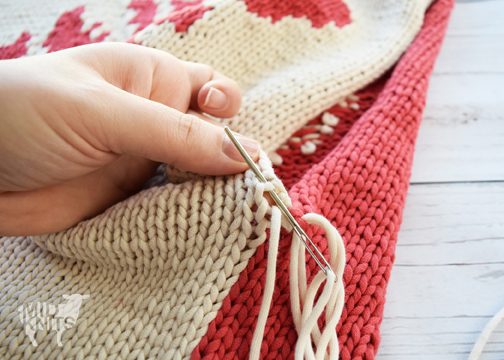
To seam the horizontal sides of the cushion I used an invisible horizontal seam stitch.

How-To: Using a tapestry needle and a piece of Bernat Maker Home Dec in a corresponding colour to the cushion work with the bound-off edges of the cushion lined up stitch-by-stitch:

+ Insert the needle up through the center of one stitch on the first piece.
+ Insert the needle under a full stitch on the second piece.
+ Insert the needle back through the center of the the same stitch on the first piece and up through the center of the next stitch.
+ Continue in this manner, working stitch by stitch, and adjusting to tension on your yarn to create a row of stitches that are the same gauge as the rest of your cushion.
+ Check out your awesome invisible seam!

Be sure to post your amazing creations to Instagram and tag me @midknits #midknitsmakers. I would love to see your makes!

Get the free Very Amoosing Knit Pillow pattern from the Yarnspirations Canada 150 Lookbook!

Happy Knitting,
Erin

Knit Maple Leaf Applique

YarnspirationsErin BlackComment

Add a touch of colourful Canada-Love to your knitting projects! This Maple Leaf Knit Applique lets you add a pop of patriotism anywhere you like and it is a FREE pattern from the Yarnspirations.com Canada 150 Lookbook. This little beauty measures in at about 5" (12.7 cm) in diameter and is the perfect size for so many applications.

At first go, I think I made about 10 of these. They work up so fast!

Okay, maybe not quite this fast, but still...

Once you knit the main part of the leaf use your hook to surface slip stitch the stem in place and get ready for some blocking.  I find that the Bernat Handicrafter Cotton blocks beautifully making the job really satisfying!

"But now that I have 1 million of these little beauties blocked and looking all crisp and Maple Leaf-y, what am I going to do with them," you ask?

These are just a few of my favorite ideas...

Bernat Handicrafter Cotton is absorbent and soft making it the perfect choice for a coaster.

Stitch It On! You can sew, or glue, these appliques onto almost anything!

Stitched onto little goody bags, these would make the perfect gift at your Canada Day Celebration!

Fascinating Fascinators! How cute is this headband!?! Simply sew through the backs of the stitches and around the band to secure the applique in place.

Festive T-shirts are easy to make. Just stitch the applique in place or, to make them removable, you could always just tack them in place with a couple of sewn stitches at each point.

I love a good throw pillow, and these are so cute they would be perfect for all year round!

These are just a few ideas and I am sure you will be able to come up with about 100 million more. This pattern is so versatile! Be sure to post your amazing creations to Instagram and tag me @midknits #midknitsmakers. I would love to see your makes!

Get the free Maple Leaf Knit Applique knitting pattern at Yarnspirations.com

Happy Knitting,
Erin

Happy Birthd-EH!

YarnspirationsErin BlackComment

It's Canada's 150th Birth-year and what better way to celebrate than to show off our Canadian pride with our favourite yarn-y hobbies; Knitting and Crochet! If you haven't had a chance to check out Yarnspirations Coast To Coast - Canada 150 Lookbook yet, make sure you do. It offers an array of free knit and crochet patterns that are all Canadian-centric in their design and super cute!

I was lucky enough to be asked to design some pieces for the collection and look forward to showing you some behind the scenes photos for some of the patterns soon!

Here are the pieces I was lucky enough to design! the patterns for the ccc, xxx and xxx are all available for free at Yarnspirations.com
DSC_0664_Copylr.jpg

The patterns are all available on the Yarnspirations.com website for free!

Croch-EH! Throw Pillow
A-moose-ing Knit Pillow
Lumberjack Crochet Throw
Maple Leaf Knit Applique
Crochet Buffalo Plaid Afghan

Take a look at these other amazing projects that are also available through the Coast To Coast - Canada 150  Lookbook.

patons-classicwoolbulky-k-truenorthknitjacket-web2.jpg
patons-canadiana-c-flyinggeesecrochetblanket-web2.jpg
patons-classicwoolbulky-k-gotoseedknitscarf-web2.jpg

Go To Seed Knit Scarf

I will definitely have to make some of these projects for myself!

Happy Knitting & Crocheting,
Erin

Be sure to post your amazing creations to Instagram and tag me @midknits #midknitsmakers. I would love to see your makes!

Mega Free Knitting Pattern!

Free Knitting PatternsErin BlackComment

Hi Everyone! As promised I have been working away on a Free Pattern to kick off the new blog and here it is.....

This throw blanket is made using a wonderfully thick yarn called Bernat Mega Bulky which comes in an array of beautiful colours. The yarn is 100% Acrylic and is a #7 Jumbo Weight. It is thick thick, like 3/8" thick! It is soft and has a luxurious sheen that creates fantastic stitch definition. This blanket works up super fast and super warm and super cuddly, so let's get to the pattern...

MEGA KNIT THROW BLANKET
knitting pattern 2017001

Written in Standard US Terms.

+ DIMENSIONS:
Width: 46" (116.84 cm)
Length: 54" (137.16 cm)

+ SKILL LEVEL:
Easy

+ TECHNIQUES:
Knit, Purl, Easy Color Change, Pom-pom.

+ SUPPLIES REQUIRED:
US size 36 (20.0 mm) knitting needle (approx. 40” (101.60 cm) or longer)
Yarn needle

+ YARN:
Bernat Mega Bulky
#7 jumbo weight
100% Acrylic
300 g (10.5 oz) / 58 m (64 yds)
3 skeins (1 for blanket, 2 for pom-poms) Radiant Orchid (yarn A)
7 skeins Light Grey Heather (yarn B)

+ GAUGE:
Approx. 9.75 sts x 14 rows = 8" square in pattern stitch.

+ ABBREVIATIONS:
BO = Bind off
CO = Cast on
rep = repeat
st(s) = stitch(es)


+ PATTERN:
with yarn A
CO 56 sts
Row 1: knit all sts.
Row 2: purl all sts.
with yarn B
Rows 3-92 : rep row 1 and 2.
with yarn A
Row 93: knit all sts.
Row 94: purl all sts.
BO
Break yarn and pull through remaining st.

FINISHING:
Weave in loose ends.

Make 8 pom-poms and attach 4 evenly along each trim edge of the blanket.

+Wrap the yarn approximately 40 times around your hand.
+Secure the center of the pom-pom with a piece of  thread.
+To secure the pom-pom, I like to use a needle and the ends of the thread to sew through the center of the pom-pom a few times.
+Cut through the loops at either end of the pom-pom.
+Fluff up the pom-pom and trim around it to make it perfectly round.

I like to make my pom-poms removable so that they can be taken off before washing. Just use a piece of yarn, thread it through the center of the pom-pom, and tie it to the edge of the blanket.

Happy Knitting,
Erin

P.S. Don't worry crocheters, I haven't forgotten about you. Stay tuned...

Be sure to post your amazing creations to Instagram and tag me @midknits #midknitsmakers. I would love to see your makes!


Feel free to sell your finished items*. Please be sure to give pattern design credit to "Erin Black of Midknits" and link back to this post. Please do not re-publish my pattern or photos.

(*intended for individuals who want to sell their handmade items at craft fairs, in small brick and mortar shops, and in small online stores. Please No Mass Production.)

If you are a blogger or website who would like to feature this blog post, please feel free to do so as long as you only use 1-2 photos and link back directly to this post for the full tutorial.

All patterns, information, and photos belong to Erin Black. Any unauthorized reproduction or distribution, in whole or in part, is strictly prohibited. © 2017 Erin Black.